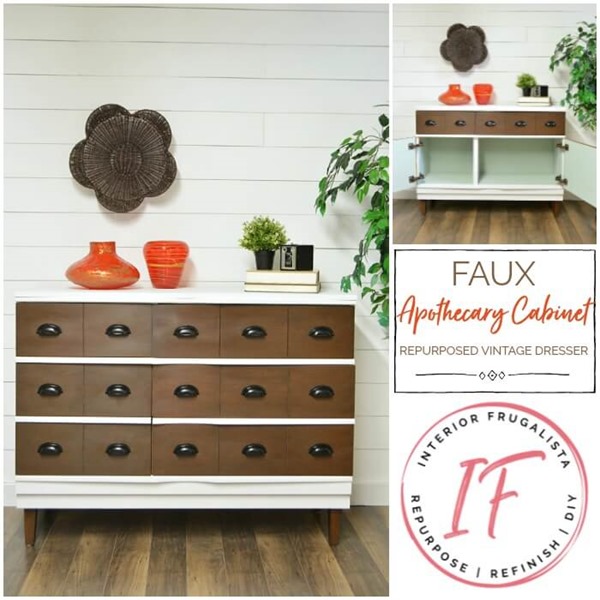
Today I'm sharing a furniture makeover with sentimental value as it's a piece of furniture my parent's purchased shortly after they married in the late 50s. If they could see it now, I hope they would approve of their vintage dresser being turned into a
DIY faux apothecary dresser.
The inspiration for turning this dresser into an apothecary cabinet came from the grooves in the center of the large drawers that reminded me of small apothecary drawers. The six-drawer vintage dresser may look like it now has fifteen small apothecary drawers but in reality, it only has two.
It is
Furniture Fixer Upper Day where six talented furniture painting friends come together once a month to breath new life into an old piece of furniture. You can find links to the other five makeovers at the bottom of this post. Last month I transformed a golden oak
Pedestal Console Table with a French Chatellerault furniture transfer.
DIY Faux Apothecary Dresser
By painting the outside of the 50s dresser white and adding legs, it retains its mid-century modern charm. No longer functional as a dresser, it would make a lovely media cabinet, dining sideboard, or home office credenza.
I'm hoping we can keep this dresser in the family like we did with the matching tallboy dresser that was converted it into a
Faux Secretary Desk. With both pieces of their original bedroom set modified, my parents either rolled over in their graves or thought, "well look at that". Hopefully the later.
The drawers were stained and a little worse for wear so they got a pop of sage green both inside and out. They were also lined with striped wrapping paper set loosely in place.
Originally this Canadian made vintage dresser by Victoriaville Furniture Ltd. out of Quebec had a blonde
Labrador Sand finish. After my parents gifted it to us for our daughter's room we refinished it with a white pickling stain. I don't know what we were thinking when we added all those round knobs!
After our daughter left the nest the dresser was converted into an office credenza but more about that mess later on in the post.
Once that incarnation was no longer useful, we moved it into the basement workshop where sadly it was used and abused as a worktable.
When we reorganized the room, (catch the
basement workshop tour here) it no longer accommodated the dresser. Taking up valuable floor space, I'm thrilled to finally have the dresser outta there.
With a lot of elbow grease and help from Mr. Frugalista, we were able to breath new life into the neglected but well-built dresser and this is what it looks like now.
Big difference, right? The surprise waiting inside happens when you go to pull out a middle or bottom drawer and discover it's actually a swingout door to a pretty painted cupboard.
Instructions for turning a vintage dresser into a faux apothecary dresser
Towards the bottom of this post, I've included a supply list of products I used or recommend for this furniture makeover. They contain affiliate links and at no cost to you, we receive a small commission if you make a purchase.
This furniture makeover is all about using what I had on hand and a good example of how you can mix and match different product brands as long as they work together. Mine are all waterbased products.
Prepping the apothecary dresser for paint
The first order of business is to strip the pickling stain and all the paint splatters with
EZ Strip, a low VOC water-soluble paint stripper that can safely be used indoors. Because I planned on leaving it to sit 1-2 hours, I kept it wet by covering with plastic.
It took two applications and the finish came off easily with a scraper. The remaining bits were removed with a 220-grit sanding pad and mouse sander.
The dresser is mahogany and guaranteed to cause the tannins in the wood to bleed through the paint, especially considering I'm painting it white. I brushed one coat of
stain-blocking primer and that did the trick.
Paint the apothecary dresser exterior
Now that the dresser is primed and ready for paint, I brushed three coats of
Behr Chalk Paint in the color Tin White with my
favorite paintbrush. I prefer working with a damp brush because it helps move the paint better. I spray it using this handy
water misting spray bottle before dipping it into the paint.
I lightly sanded between coats with 220-grit sandpaper for a smooth as butter finish and waited two hours between coats.
Turning the drawer fronts into faux apothecary cubbies
As I mentioned earlier, the inspiration for turning this piece into an apothecary dresser came from the grooves in the center of the large drawers. We replicated the grooves by adding one more to each drawer front.
To do this Mr. Frugalista set the table saw to the same depth as the original groove and ran the drawer fronts through the saw blade. Voila, the look of fifteen apothecary drawers.
Staining the faux apothecary drawer fronts
The drawer fronts are stained with two coats of waterbased gel stain in the color Tobacco Road and lighted sanded with 220-grit sandpaper between coats. I apply the stain with a damp
chip brush and wipe it over the wood with a lint-free
shop towel.
Once the stain dried overnight, I deepened the color by brushing dark wax over the stain with a
round wax brush. You can see the difference between the stain only (after just one coat) and the stain and wax combo in the photo below.
The real reason we turned the bottom four drawers into a cupboard
Sadly because of the former credenza modification, the interior of the dresser was butchered, rendering the bottom four drawers impossible to function as such again. Hence the reason for turning the bottom of the dresser into cupboards.
In that credenza modification, we had joined two sets of drawers into deep drawers for hanging file folders. You can get an idea of the mess it made of the dresser interior and the drawers in the photo below.
Modified dresser to accommodate two drawers and cupboards
In order to put this dresser back together again, we moved the drawer divider trim towards the bottom over to the top. We also moved the one remaining drawer slider so now the two intact drawers that survived are now at the top of the dresser (pictured below).
To turn the bottom portion of the dresser into cupboards Mr. Frugalista added a base and center divider with smooth 1/4-inch thick hardboard (pictured below). He attached it in the center by screwing into the center faceplate and L-brackets at the top towards the back.
Once that was done I painted the cupboards with two coats of Rustoleum Chalked Ultra Matte Paint in the color Sensible Sage. The drawers were a little worse for wear so I also painted them the same color.
Modifications to the drawer fronts to be turned into doors
After the four damaged drawers were dismantled and the drawer trim removed from the dresser, they are joined together to make cabinet doors.
To do this a piece of 1/4-inch thick hardboard is cut to size about an inch shorter on the sides so the doors close tight against the front of the dresser.
Next, one side of the hardboard is painted the same sage green as the interior cupboards. After the paint dried the drawer fronts and trim pieces are glued onto the unpainted side of the hardboard with construction adhesive and set to dry overnight (pictured below).
In order to have clearance for the extended edge on the doors, we had to use
fully concealed 4-Way 175° hinges. This type of hinge is commonly used so cabinet doors swing out of the way for pullout shelves.
Adding cup pulls onto the faux apothecary drawers
Finding fifteen cup pulls in this town was almost next to impossible. Of course, I didn't give myself enough time to order some online but Mr. Frugalista managed to find some black ones at Rona.
With that many pulls so close to together, there is no room for error when mounting them. To keep the holes perfectly lined up and centered in each square we used a handy dandy
Kreg Cabinet Hardware Jig. After a little measuring to set the jig up, we had all thirty holes drilled in no time.
Adding legs to the dresser
I had these awesome tapered wooden legs in my stash. The existing screw pins are meant to use with metal mounting brackets. Mr. Frugalista removed those and inserted double-ended dowel screws for wood into the legs and then the base of the dresser.
I should mention that blocks of wood had to be attached to the bottom of the dresser to accommodate adding legs. But first, the legs were sanded to remove the original finish and stained to match the drawer fronts. They also got a coat of dark wax to deepen the color.
Protective finishes
To protect the chalk painted surfaces, the sides of the dresser and interior walls are protected with clear wax and buffed to a matte finish. The top of the dresser and the bottom of the cupboards are protected with Gator Hide, a water repellent matte clear coat that is more durable.
Recommended products
Low VOC Paint Stripper
Plastic Scraper
Stainable Wood Filler
Stain Blocking PrimerShop TowelsChip BrushPaintbrushWhite Chalk PaintSage Green Chalk PaintWaterbased Tobacco Road Gel StainClear Wax
Dark Wax
Round Wax BrushWater-Repellent Clear Coat1/4" Smooth Hardboard
Wood Construction Adhesive
Blackened Bronze Cup PullsWood Tapered Legs4-Way 175° HingesTools
Kreg Cabinet JigTable sawCordless Drill
Mouse or Orbital Sander
The takeaway from this furniture makeover is that when there is sentimental value attached to a piece of furniture, find a way to salvage, repurpose, and/or refinish it with some careful thought and reLove it into your living space. I hope our DIY faux apothecary dresser has inspired or taught you something new along the way.
I love the white paint and dark stain combination. I used it when giving this
Mid-Century Modern Cedar Chest a makeover.
If you have any questions about this makeover, please leave them in the comment section below or press the Contact Me button at the top of the blog to drop me an email. I love hearing from you!
Please join me to see how my talented friend's transformed these furniture pieces. Press the links below to see the after photos and tutorials.
- Girl In The Garage
- Confessions Of A Serial DIYer
- Petticoat Junktion
- Just The Woods
- Salvaged Inspirations
- The Interior Frugalista (that's me)
I share my projects at these inspiring
link parties.









 DIY Links


