Tutorials etiketine sahip kayıtlar gösteriliyor. Tüm kayıtları göster
Have you ever tried to harvest and dry lavender from the garden? One of the flowers my daughter chose for her wedding was lavender. I soon learned the high cost of purchasing dried lavender when making the table centerpieces, aisle bows, floral bouquets & boutonnieres as well as the homemade lavender lollipop guest favors.

While pulling out of our driveway to make the 9-hour trek to the wedding destination, I caught a glance of the abundant lavender blooms in our front flower bed. I got to thinking, had I the foresight to harvest and dry the lavender last summer, I could have saved a lot of money.

How To Harvest and Dry Fresh Lavender

How To Harvest And Dry Lavender


I am embarrassed to admit that we've had the plant for several years and not once have I harvested the flowers. Every Summer I've admired the blooms and every Fall after the flowers died off I would cut it back. Thankfully, after we returned from our daughter's wedding, the plant was still in full bloom and I decided this was going to be the year that I finally harvest the lavender!

Lavender Plant Before Harvesting

But first I needed to figure out how and do some online research. Then I got to thinking, I wonder if any of my readers have never harvested their lavender and that's when I decided to share what I learned with all of you.

For those of you who have successfully dried lavender and have any helpful tips I may have missed, I'd be most grateful if you shared them in the comment section at the bottom of this post.

Lavender Harvested For Drying

What you'll need to harvest and dry fresh lavender

  • Rubber bands or jute twine
  • Scissors
  • Paper Clips
  • Large flat sheet or box
  • Hangers, chain, or doweling rod
Harvesting Lavender Plant For Drying

How to harvest fresh lavender

  • The best time to harvest the plant is when the buds have formed but the lavender is not in full bloom. If you wait too long to harvest (like I did) the dried bunches will be less potent.
  • Harvest the flowers mid-morning or evening when the sun is less intense and the plant is completely dry from any morning dew.
  • Cut in bundles the size that can wrap around your hand.
  • Leave about 2-inches of growth on the plant and don't go down to the woody portion of the stem.

Fresh Lavender Bundles For Drying

How to dry fresh lavender

  • Wrap a rubber band or jute twine tightly around each bundle.
  • Open a small paper clip and use it as a hook to hang the lavender.
  • Hang the bundles of lavender upside down from a coat hanger, along a chain (like I did), or doweling rod.
  • Lay a flat sheet or large cardboard box underneath to catch the petals that fall off (great for sachets).
  • Drying upside down helps the lavender retain its blossom shape.
  • Dry the lavender in a dry and dark place. The dryness is most important to prevent mold or mildew. The darkness helps the lavender retain its color.
  • Let the lavender dry between 2-4 weeks until there is no moisture left in the stems at the center of the bundle.
  • Check the bundles every so often because they could shrink a little and may require tightening the elastic or string.
  • If you don't have a dark and dry place to hang the bundles, cover the bunches with brown paper bags with holes cut along the sides and bottom for air to circulate. Dry them in a place with more light.
  • If you live in a high-humidity zone, tie the stalks individually with about 3-inches between each stalk on a strand of string, to prevent mold or mildew from developing.

Lavender Harvested For Drying

What to do with dried lavender

  • Fill pitchers with dried lavender bundles for fragrant displays around the house.
  • Use them in wedding bouquets, boutonnieres, and corsages.
  • Make small fragrant wreaths to hang on cabinet doors. 
  • Use them for scented drawer sachets.
  • Blended with Epsom salts for relaxing baths. 
  • Make lavender handmade soaps.
  • If they were grown organically without pesticides, use the buds for cooking like my Lavender Shortbread Cookies.  
  • Make fragrant Fire Starter Bundles from the cut stalks (pictured below).  
Lavender Fire Starter Bundles

Storing dried Lavender

  • Store bundles in a paper bag in a dark, dry place.
  • Store flower stems in a paper bag or lidded mason jar.
  • For cooking, potpourri, and lavender sachets - run your finger along the stalks to remove the dried flowers and store in a box or paper bag. 

Source List


Like I mentioned at the top of this post, I made lavender infused hard candy lollipops dipped in lavender sugar for my daughter's wedding. You can find the recipe I used here at Garden Therapy.

Lavender Infused Handmade Hard Candy Lollipops

I hope you found this post helpful and I gave you some ideas for decorating and cooking with lavender. If you have any questions about this makeover, please leave them in the comment section below or press the Contact Me button at the top of the blog to drop me an email. I love hearing from you!

Again, if you have any helpful tips I may have missed about harvesting and drying lavender, I would love it if you shared them in the comment section below.


How To Harvest And Dry Lavender

I share my projects at these inspiring link parties.

Did you know that you can paint over mid-century modern Arborite furniture? It's totally doable but there are two simple but important steps to doing it right for a long lasting finish. In this post, I'm sharing the scoop on how to paint Arborite as well as a retro dining table makeover. The mid-century modern table is small and has one drawer that I think would also make a great desk or vanity table.

I'm sharing the retro table makeover first and the Arborite painting tutorial further down in the post.

How To Paint Arborite Retro Dining Tables

How To Paint Arborite Retro Dining Tables


It is Furniture Fixer Upper Day where six talented furniture painting friends come together once a month to breath new life into a piece of furniture. You can find links to the other makeovers at the bottom of this post. Last month I tried my first attempt at a painting technique that I had been itching to try and I'm pleased with how the Pink Ombre Waterfall Dresser turned out.

This month it's a bright bold vintage table makeover that works well with the unique mid-century modern gold metal legs. But I couldn't stop with just a bright color. Remember my Geometric Waterfall Dresser? Well the stencil I used on that makeover was calling my name and it added a fun playful vibe to this retro table.

Arborite Retro Dining Table Makeover


To see where we started, this is what table the looked like before...
Arborite Retro Dining Table Before

And here it is after the makeover paired with a Glam Vanity Stool I refinished last year to show you how the table would make a cute vanity table.

Arborite Retro Dining Table After With Vanity Stool

The legs were showing some wear and so they got freshened up with gold paint.

Painted Arborite Retro Dining Table

The table is glam on the bottom and party on the top with this fun blue and white geometric pattern.

Geometric Stenciled Arborite Retro Dining Table

The inside of the drawer has a little stencil surprise too.

Blue Polka Dot Stenciled Arborite Retro Dining Table

And rather than replacing the original knob like I normally do, I decided to keep the brass knob and paint the wood button in the center white. It plays nicely with the gold trim around the table top and the table legs.

Vintage Brass Arborite Retro Dining Table

How to prep Arborite furniture for a lasting finish

This post contains affiliate links for your convenience so you can see what products I used or recommend to make this project. See my full disclosure policy.

The next three steps for prepping Arborite furniture for paint are the most important for a lasting finish. I'll be the first to admit that these steps are tedious but if you skip them, you will regret it later. Ask me how I know!

Clean

Remove any dirt, grime, and grease with a scrub pad and pail of warm water, 1/4 cup of vinegar and a drop of Dawn dish soap. Another option is using this cleaner but I ran out and have it on my shopping list.

Sand

Sand the Arborite to rough up the smooth surface. I used a mouse sander with an 80-grit sanding pad. Be careful not to sand beneath the veneer.

Wipe the dust with a damp microfibre cloth and follow with a tack cloth to remove fine particles. Rub your hand over the Arborite to feel if it's rough to the touch. If not, carefully repeat the sanding process.

Dust free sanding tip:

If you paint indoors like I do, here's a great dust free sanding tip that I learned from my fellow Furniture Fixer Upper pal Kandice at Just The Woods. Connect the end of your sander to the hose of your shop vacuum and hold them together with duct tape. Genius!

Arborite Retro Dining Table Prepping For Paint Tip 1

Prime

Prime the roughed up Arborite with two coats of primer, rolled on with a foam roller. Wait about an hour between coats and lightly sand with 220-grit sandpaper for a smooth finish.

Arborite Retro Dining Table Prepping For Paint Tip 2

NOW that we've done the necessary dirty work, it's time for the fun part, making the vintage Arborite table pretty with paint.


How to paint Arborite furniture for a lasting finish

For this retro dining table, I decided to go bright and bold and keep the retro vibe going with a fun stencil.

Paint

I painted three coats of Peacock blue chalk mineral paint over the primed surface with a small foam roller. I waited an hour between coats and lightly sanded the paint with 220-grit sandpaper followed by a wipe with a tack cloth.

Arborite Retro Dining Table Painted Peacock Blue

The table apron and inside the drawer was brushed with three coats of Fluff chalk mineral paint.

The metal legs were showing some wear so I removed them from the table and headed outside. It was the perfect sunny Spring day to refresh the legs with this pure gold spray paint. It's a good thing I painted them when I did because the weather turned the following day.

Spray Painted Metal Legs Arborite Retro Dining Table

Stencil

Like I mentioned earlier, I couldn't stop at the bright Peacock blue paint color and decided to add some retro fun with this geometric wall stencil.

Arborite Retro Dining Table Geometric Stencil

To stencil the table top I poured the same Fluff chalk mineral paint onto a paper plate and dabbed the excess onto a paper towel so very little paint remained on the brush.

I opted not to use the quicker method of stenciling with a stencil roller because the top had only been painted less than 12 hours earlier and I didn't want to risk using stencil adhesive to hold the stencil in place.

Instead, I used delicate surface Frog tape to hold the stencil in place and pounced the paint with a stencil brush.

Arborite Retro Dining Table Stenciled With Geometric Pattern

A surprise waiting inside the table drawer

The outside of the drawer was painted the same Peacock blue and the inside the Fluff white. I added a surprise to the bottom of the draw with this polka dot stencil.

Arborite Retro Dining Table Drawer Stenciled With Polka Dots

Protect

Normally I wax my chalk painted furniture pieces but with table tops, they will likely have drinks set on them and so I protect the chalk paint with three thin coats of this matte water-repellent clear coat. This will give the table a rock hard finish after 48 hours.

Arborite Retro Dining Table Water Repellent Clear Coat

Part of me wonders if I should have painted the apron Peacock blue and the drawer front white. What do you think?

I'd love to get your feedback and/or any questions you might have about this makeover. Please leave them in the comment section below or press the Contact Me button at the top of the blog to drop me an email. I love hearing from you!


How To Paint Vintage Arborite Retro Dining Tables

Mid Century Modern Arborite Retro Dining Table

Painted Arborite Retro Dining Table Makeover Before And After

Please join me to take a look at how my talented friend's transformed these furniture pieces...
Furniture Fixer Uppers Before April 2019
Press the links below to see the after photos and tutorials...
  1. Girl In The Garage
  2. Confessions Of A Serial DIYer
  3. Petticoat Junktion
  4. Prodigal Pieces
  5. Just The Woods
  6. The Interior Frugalista (that's me)

I share my projects at these inspiring link parties.

Did you know you can make brand new wood look like its been aging naturally for years? And the best part is that what you need to do it can be found in your pantry! It's an easy technique and you can watch the aging process happen before your very eyes. In this post, I'll show you how to age new wood with stuff from your kitchen in two different ways.

I'm often asked this question when I've used this technique in projects posted on the blog. Instead of repeating the instructions every time I use it, I thought it would be easier for you guys to find the instructions in one dedicated tutorial post.

How To Age New Wood With Stuff From Your Kitchen

How To Age New Wood With Stuff From Your Kitchen


I should point out that the resulting patina will vary depending on the type of wood.

Aging New With Pantry Goods Solution


Age New Wood With Tea And Vinegar Solution


Wood Aging Solution Recipe:

  • Use a container with a lid like a large plastic food container.
  • Fill the container 3/4 full with White Vinegar or Apple Cider Vinegar (my preference).
  • Submerge a large piece of #0000 gauge steel wool into the vinegar and close the lid.
  • Let it steep for a minimum of 12 hours (I prefer a week). The longer the solution steeps and disintegrates the steel wool, the darker the stain. 
  • When the aging solution is ready to use, run it through a strainer into a clean mason jar or glass jar with lid. 

Wood Aging Instructions - Step 1

  • Brew a pot of black tea. My preference is Earl Grey because no sense wasting it all on wood.
  • Steep the tea for at least 30 minutes to an hour.
  • Pour the black tea through a strainer if you used loose tea.
  • Brush the tea onto bare wood with an inexpensive chip brush and let dry completely.

Wood Aging Instructions - Step 2:

  • Wear rubber gloves because not only will it stain your fingers but the smell will stay on your hands for days. Ask me how I know.
  • Brush the aging solution onto the tea stained wood with an inexpensive chip brush.
  • Let it dry between coats.
  • Repeat with as many coats required to get the aged patina of your liking.

How it works:

The acid from the vinegar reacts to the tannins in the wood and essentially provides an acid wash stain that creates that lovely aged patina.

You can see how it worked on the Rustic Wood Wedding Card Caddy below. This is the wood caddy before staining...

Aging New Wood With Pantry Goods Before

...and after staining with the vinegar and tea aging solution. Again the patina will be different depending on the type of wood you use.

Aging New Wood With Pantry Goods After

Aging New Wood With Pantry Items Supplies

Age New Wood Without Tea

The recipe is the same as the one above but skipping the black tea step. It really comes down to personal preference. I suggest you try both methods on a sample board of whatever type of wood you'll be using for your project.

In this example using lumber for our Large Rustic Plank Wood Clock project, instead of applying the aging solution with a chip brush, I applied it with the steel wool remaining in the container.

Aging New Wood With Pantry Items Steel Wool Application

In the photo below you can see the difference between the treated and untreated wood. You'll notice the aged patina is lighter without the black tea.

Aging New Wood With Pantry Items Before And After

I hope you found this tutorial helpful. If you have any questions, please don't hesitate to ask in the comment section below or press the Contact Me button at the top of the blog to drop me an email. I love hearing from you!

How To Age New Wood With Pantry Goods

I share my projects at these inspiring link parties.


Should the furniture be sanded before painting with chalk paint? This is the one question I get asked most often and my answer is, that it depends. While many chalk paint brands say their paint doesn't require sanding, I always err on the side of caution, especially considering I sell my painted pieces. But there are some instances where I absolutely won't sand and so here I'm sharing tips on how to prep furniture for chalk paint from A to Z.

How To Prep Furniture For Chalk Paint A-Z

How To Prep Furniture For Chalk Paint A-Z


I hope you find this tutorial helpful whether you're about to paint your first piece or have a few painted pieces under your belt. You ALWAYS want to have a good bond with the paint.

If you've been following the blog for a bit you know that I have a workshop in the basement of our home. I also live in a cold winter climate and so good ventilation is always a problem. For these reasons, I use low to no VOC (volatile organic compound) products.

Affiliate links are included so you can see what products I use or recommend for prepping furniture. See my disclosure policy.

Clean the furniture before painting

Unless you know where it came from, you're going to want to give it a good scrub. Vacuum all the cobwebs inside, underneath, and on the back. My preference for cleaning furniture is one gallon of warm water with a drop of dawn dish soap and 1/2 cup of white vinegar. Wipe down all the surfaces with a damp rag.

Remove the drawers and/or doors before painting

Some people prefer to keep the doors and drawers in place when painting furniture. Unless the piece is really old and there is a chance of not getting the hardware lined up again, I always remove them.

Label the back of each drawer with chalk so you know which belongs where (ask me how I know about this important this step).

Label Drawers To Prep Furniture For Chalk Paint

Remove the hardware before painting

Unless you plan on painting the original hardware (which I've been known to do on occasion), remove the knobs, pulls, and door hardware. Place them and the screws in a tub or tray so they don't get lost.

Raise the furniture from the ground before painting

Raise the furniture from the ground before painting so it's easier to paint along the bottom. My preference is these 3-wheel furniture dollies so the furniture can be moved around if need be. Placing it on top of paint cans or blocks of wood also works fine too.

Raise Furniture To Prep For Chalk Paint

If you suffer from back or knee pain like I do, a hydraulic rolling mechanic stool will be your best friend. Raise and lower it as needed and scoot around the furniture as you work. Note: you want one with a short stem that doesn't restrict how low you can go. No more constantly getting up and down or kneeling on a hard floor.

Fill any imperfections before painting

Fill any holes, deep scratches, and dents with wood filler. My preference is this non-shrinking filler compound.

Fill Holes To Prep Furniture For Chalk Paint

Do NOT sand furniture if...

  1. You suspect it may have been painted with lead paint. Painted pieces from the late 70's and back are more likely to contain lead. There are lead test kits available should you want to test first. I personally err on the side of caution unless I'm 100% certain. 
  2. It has a smooth Arborite or high gloss enamel finish.
  3. The wood is cherry or mahogany. Sanding will open the grain and cause the tannins in the wood to bleed through the paint.

How to prep furniture that CAN'T be sanded 

For smooth Arborite or high gloss enamel surfaces, prime first before applying paint with either a brush or foam roller. My go-to primers are Bulls Eye 123 Primer or Slick Stick.

For wood that causes bleed through or pieces with stains, my go-to stain blocking primers are Bulls Eye 123 Primer Plus or clear BOSS, especially if you will be painting a light color like white. You may need to apply two coats. If a pinkish hue appears after the first coat of paint, apply another coat of primer in those areas. Both of these stain blocking primers also help to remove odors.

How to prep furniture that CAN be sanded

Note: You'll notice the photos included in this post is of a previously painted piece. I knew it was safe to sand because I was the one who painted it many years ago with latex paint.

Wrap 150-grit sandpaper around a sanding pad and rough up the surface to give the paint some bite.

How To Prep Furniture For Chalk Paint With Sandpaper

You may need to bring out the big guns and sand with either an orbital sander, palm sander, or mouse sander. My preference is a mouse sander because I like how it feels in my hands, it can easily get into tight corners, and I feel like I have more control. However, if it's a rather large piece, I'll use an orbital or palm sander.

You can see in the photo above that my mouse sander is well used and a bit of a relic. Time to consider replacing it.

Remove sanding dust from furniture before painting

Wipe the furniture with a damp cloth to remove sanding dust. Remove lingering fine dust particles with a tack cloth.

Remove Dust To Prep Furniture For Chalk Paint

Cover holes on the drawer fronts

Place tape over the hardware holes on the inside of the drawers to avoid paint seeping through and clogging the hole or worse, seeping into the inside of the drawer.

Cover Hardware Holes To Prep Furniture For Chalk Paint

Now you're ready for the fun part, paint!

Tip for testing paint bond

Should you decide to heed the chalk paint brand's claim that their paint does not require sanding, here is a tip to test whether it bonded well with your furniture. Do the fingernail test after 24-hours. Scratch the paint with your fingernail and if it comes off, then you need to do more prep.

If you have any questions about prepping furniture for chalk paint, please feel free to leave them either in the comment section below or press the Contact Me button at the top of the blog to send me an email. Visit my tutorial page for more helpful tips.


How To Prep Furniture For Chalk Paint A to Z

I share my projects at these inspiring link parties.

Today we're going to talk about how to completely change furniture with legs. Perhaps you have a cabinet that sits too low and would function so much better if it had more height. Maybe you have a side table with great bones but it just isn't your style.

I'm going to share three examples where adding legs completely transformed the look and style of a piece and/or gave it a new purpose. Why go out and buy new when you can upcycle what you already have.

How To Completely Change Old Furniture With New Legs

How To Completely Change Furniture By Adding Legs


Today is Furniture Fixer Upper Day where I and five talented furniture painting friends come together to breath new life into six pieces of furniture. You can find links to the makeovers at the bottom of this post. Last month I gave an antique empire dresser from the 1800s a Red Holiday-Inspired Makeover.

We'll start with this mid-century modern cabinet. It was missing the legs when I got it and assume the originals were a tapered wood leg with metal leg caps (ferrules) common with mid-century modern furniture. By adding curvy legs, it completely transformed the style of the two-drawer cabinet from MCM to French Provincial and we're now using it as a nightstand.

Example 1: Mid-Century Modern Cabinet 

This is what the two-drawer laminate cabinet looked like before with the missing the legs.

MCM Cabinet Before Without Legs

Instead of replacing the legs with similarly tapered wood legs like the originals, we added these curvy cabriole legs found at a Habitat ReStore. They are a totally different style, color, and grain of the wood but once painted, one would never know this wasn't always a French Provincial nightstand.

New Curvy Legs for MCM Legless Cabinet

Painted a matte metallic platinum silver with metallic gold highlights, it no longer looks anything like a mid-century modern cabinet. What a difference some curvy cabriole legs made on this piece!

MCM Legless Cabinet After New Curvy Legs

Besides changing the legs, changing the hardware can make a dramatic difference too like these pretty turquoise floral knobs.

Updated MCM Cabinet With New Floral Knobs

You can see the full makeover and tutorial of this metallic nightstand in my Small Mid-Century Modern Cabinet post.

I used this same metallic silver paint on a gorgeous Vintage Art Deco Waterfall Vanity too.

Example 2: Wooden Trunk Table

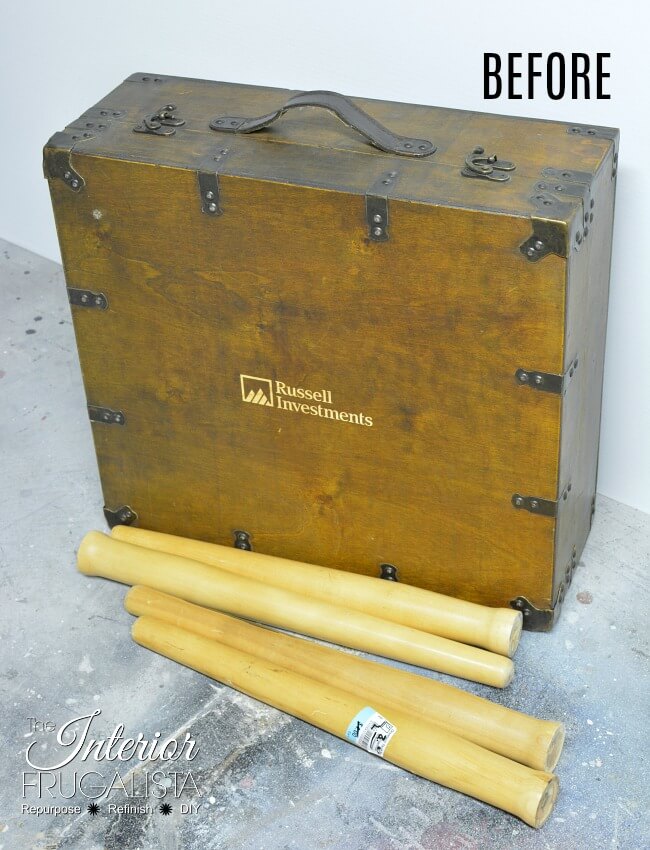
In this example by adding legs to a wooden case found at Goodwill, it was completely transformed into a lovely rustic trunk table by adding tall wooden legs found at Habitat ReStore.

Wooden Trunk Before Adding Legs

By adding legs and painting them black, restoring the wood with some dark wax, and creatively covering the company logo on the front, the case was completely transformed into a useful piece of furniture.

Wooden Trunk From Goodwill With New Legs

You can find the step-by-step written tutorial along with a video tutorial in my How To Turn A Wooden Case Into A Trunk Table post. I also share a tutorial on how to line the case with an old shirt.

Example 3: Apothecary Cabinet

In this example, I show you how by adding tall wooden legs to an IKEA Moppe mini wood chest, it was transformed into a useful apothecary cabinet for storage.

IKEA Moppe Cabinet Before Adding Legs

The legs and brackets were found at a salvage yard for $12.00 and the IKEA Moppe at a garage sale for next to nothing.

Salvaged Legs For IKEA Moppe Cabinet

We use the apothecary cabinet to house our CD collection (yes, we're all old school and still have and listen to CD's) and labeled each drawer alphabetically by artist's last name.

IKEA Moppe Turned Apothecary Cabinet With New Legs

Here is the simple IKEA Moppe mini chest now with legs, looking more like a piece of furniture rather than a storage box. It's so handy to have our CD collection in one place and displayed against a small wall in our living room, it is a statement piece that piques the curiosity of guests.

You can find the full tutorial on how we did it in my IKEA Moppe Hack Apothecary Cabinet post.

IKEA Moppe Chest Transformed Into Apothecary Cabinet

I hope this has inspired you to modify furniture that could be dressed up or provide more function if it had legs.


How To Completely Change Old Furniture With New Legs

Now let's see how my talented friends in the Furniture Fixer Uppers group transformed these furniture pieces...
Furniture Fixer Upper Group December 2018 Furniture BEFORE
Press the links below to see the after photos and tutorials...
  1. Girl In The Garage
  2. Confessions Of A Serial DIYer
  3. Petticoat Junktion
  4. Prodigal Pieces
  5. Just The Woods
  6. The Interior Frugalista (that's me)

I share my projects at these inspiring link parties.