
Is it a console table or a sofa table, what's the difference? Well, it could be either. Both console and sofa tables are shallow in depth and table or desk height. Console tables traditionally are placed against a wall and sofa tables behind a sofa. Sofa tables should be no taller than the back of a sofa and no wider than six inches on either end. So I'm calling mine a French Console Table because I've added Parisian flair with a pretty Chatellerault furniture transfer.

The base of my oval console table has unique octagonal column double pedestal legs and empire style feet.

It is Furniture Fixer Upper Day where six talented furniture painting friends come together once a month to breath new life into a piece of furniture. You can find links to the other makeovers at the bottom of this post. Last month I transformed a rather plain pine children's dresser into a Whitewashed Farmhouse Sideboard Buffet.
For my console table makeover this month, let's take a look at what it looked like before the makeover. The original honey or golden oak finish dated this piece and so I didn't feel guilty about painting it. If it were an antique I may have considered stripping and staining it a darker color.

And here it is now, after the makeover. Big difference, right?

So pretty painted green. The color is called Upper Canada and couldn't be more appropriate considering this coming weekend we celebrate Canada Day.
But my favorite part of the console table makeover is the pretty French Prima Chatellerault furniture transfer on the top. Between it and the paint color, the console table has that lovely French Country charm.
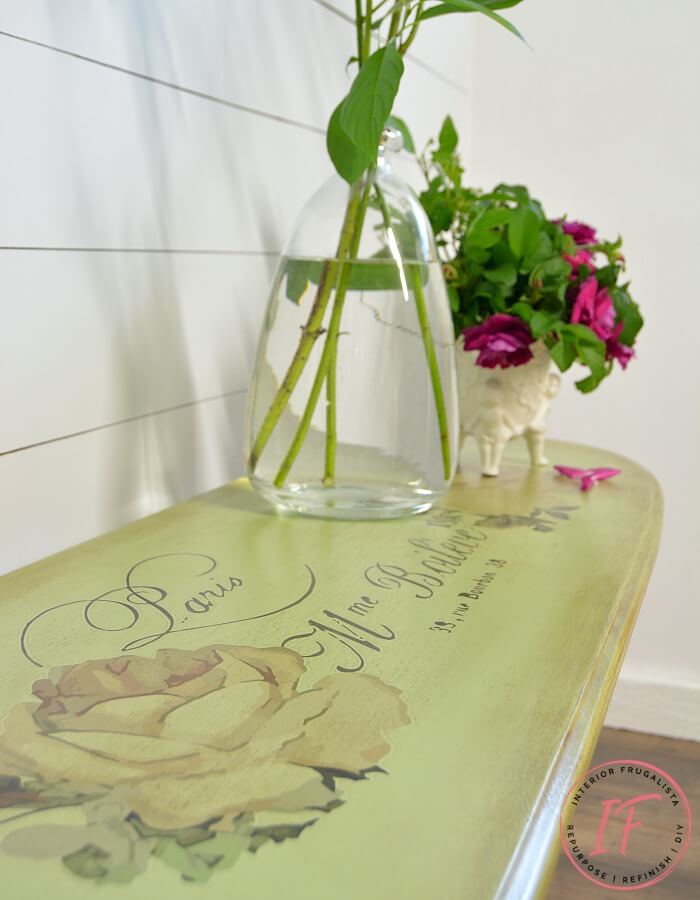
The pretty Chatellerault transfer may look familiar because a few months ago I used part of it on a Duncan Phyfe Coffee Table Makeover. I've been itching to use the rest of the transfer on another piece and this pedestal console table was a perfect candidate.

I couldn't resist photographing the oval console table with fresh dogwood branches and pretty pink knock out roses from my garden. The scent of the roses filled the room and was heavenly while taking these photos.

First I wiped it down with warm water with a drop of Dawn dish soap and 1/2 cup of white vinegar. After it dried I scuffed the surface with 150-grit sandpaper to give the paint some bite and wiped it down with a damp rag, followed by a tack cloth to remove any fine dust particles.


The hardest part of using furniture transfers is waiting at least 48 hours before adding them onto a freshly painted surface. I used one complete transfer and just the rose from the other.
I taped the two pieces together just so I could line them up easier before transferring them onto the top of the table.

First I measured the length and width of the transfer to find the center and marked them with a sharpie onto the transfer paper. Next, I marked the center of the tabletop and marked it with chalk. This made lining up and centering the transfer much easier. Of course, I could have eyeballed it but the old eyes ain't what they used to be.

Furniture transfers are so easy to work with and I share some helpful tips below.
Prima ReDesigns has small transfers as well that can be used on signs or home decor. I used pretty vintage style floral transfers on my French Terracotta Coasters.
Once the transfer was firmly in place, I applied two thin coats of water-repellant clear coat to the TOP ONLY. Not only will it seal the furniture transfer but will protect the painted top from water rings after it is fully cured.

Some dark waxes recommend you apply clear wax first to avoid staining the paint. This allows the dark wax to be more workable for blending and removing the excess. But on this table, I cheated to speed things up by blending clear wax and dark wax together.

I put some clear wax onto a paper plate and added a few dollops of dark wax (a little goes a long way) and blended them together with a painter's palette knife. I applied the wax in sections with a wax brush, letting it nestle into the grain of the oak and wiping the excess with a lint-free rag. I also waxed the tabletop and went right over the furniture transfer with the wax which gave it an aged appearance. Next, I buffed the wax with cheesecloth but a lint-free rag or old t-shirt works just as well.
I went back in with more dark wax along the edges of the table base and top, blending the wax towards the center. For this step, you do not buff the wax. The wax fully cures in 30 days but you can gently use the table within 48 hours.
So what do you think? Have you ever tried Prima furniture transfers? If not, I hope my table has inspired you to give them a try. If a furniture transfer seems a little daunting, try a smaller transfer on a DIY sign, flower pot, or serving tray. I promise once you do you'll be hooked!

If you have any questions about this makeover, please leave them in the comment section below or press the Contact Me button at the top of the blog to drop me an email. I love hearing from you!


I share my projects at these inspiring link parties.
French Console Table Makeover With Chatellerault Furniture Transfer
The base of my oval console table has unique octagonal column double pedestal legs and empire style feet.
It is Furniture Fixer Upper Day where six talented furniture painting friends come together once a month to breath new life into a piece of furniture. You can find links to the other makeovers at the bottom of this post. Last month I transformed a rather plain pine children's dresser into a Whitewashed Farmhouse Sideboard Buffet.
For my console table makeover this month, let's take a look at what it looked like before the makeover. The original honey or golden oak finish dated this piece and so I didn't feel guilty about painting it. If it were an antique I may have considered stripping and staining it a darker color.
And here it is now, after the makeover. Big difference, right?
So pretty painted green. The color is called Upper Canada and couldn't be more appropriate considering this coming weekend we celebrate Canada Day.
But my favorite part of the console table makeover is the pretty French Prima Chatellerault furniture transfer on the top. Between it and the paint color, the console table has that lovely French Country charm.
This post contains affiliate links so you can see what products I used or recommend for this project. At no cost to you, we receive a small commission if you make a purchase.
The pretty Chatellerault transfer may look familiar because a few months ago I used part of it on a Duncan Phyfe Coffee Table Makeover. I've been itching to use the rest of the transfer on another piece and this pedestal console table was a perfect candidate.
I couldn't resist photographing the oval console table with fresh dogwood branches and pretty pink knock out roses from my garden. The scent of the roses filled the room and was heavenly while taking these photos.
Here's how I did it...
Prep for paint
Prepping this piece for the makeover was quick and easy as it didn't need any repairs - such a welcomed treat because that doesn't happen too often.First I wiped it down with warm water with a drop of Dawn dish soap and 1/2 cup of white vinegar. After it dried I scuffed the surface with 150-grit sandpaper to give the paint some bite and wiped it down with a damp rag, followed by a tack cloth to remove any fine dust particles.
Add the pretty with chalk paint
For this table, I used Fusion Mineral Paint in a pretty Upper Canada green. The color pairs beautifully with the light stain color underneath which will be peeking through the paint for a shabby chic finish. It only took two light coats of paint for full coverage. Once the paint dried I sanded it with 220-grit sandpaper for a smooth as a baby's bottom finish.A little shabby chic with sandpaper
With 150-grit sandpaper wrapped around an old sanding pad, I distressed the table along the edges for a timeworn look. I didn't apply a lot of pressure on the sanding pad and let the paint dictate where it removed easily.Add some French flair with a furniture transfer
I love Prima ReDesign furniture transfers. They are so beautiful and add instant drama to painted furniture. I had two pieces left from the Chatellerault furniture transfer that I used on the coffee table mentioned above. This particular transfer comes in three sheets.The hardest part of using furniture transfers is waiting at least 48 hours before adding them onto a freshly painted surface. I used one complete transfer and just the rose from the other.
I taped the two pieces together just so I could line them up easier before transferring them onto the top of the table.
First I measured the length and width of the transfer to find the center and marked them with a sharpie onto the transfer paper. Next, I marked the center of the tabletop and marked it with chalk. This made lining up and centering the transfer much easier. Of course, I could have eyeballed it but the old eyes ain't what they used to be.
Furniture transfers are so easy to work with and I share some helpful tips below.
Transfer application tips
- Lay the transfer with the backing paper where you want it on your furniture.
- Place painters tape on the top portion of the transfer to hold it in place.
- Slide the backing paper underneath down about 1-2 inches and rub the transfer onto the furniture using the stick provided.
- You can check by carefully lifting the transfer sheet to see where it may need to be rubbed more.
- Move the backing paper down another 1-2 inches and repeat the steps above until the entire transfer is lifted from the transfer sheet.
- Use a lint-free cloth or your fingers to rub any sections that may not have fully transferred.
Prima ReDesigns has small transfers as well that can be used on signs or home decor. I used pretty vintage style floral transfers on my French Terracotta Coasters.
Clear coat protection on the tabletop
So the paint on this table was protected in two steps. The first being sealing the furniture transfer on the tabletop.Once the transfer was firmly in place, I applied two thin coats of water-repellant clear coat to the TOP ONLY. Not only will it seal the furniture transfer but will protect the painted top from water rings after it is fully cured.
Give the paint some depth with wax
The Upper Canada color looks gorgeous when paired with dark wax. In the photo below you can see the difference between the unwaxed and dark waxed columns on the pedestal table. See how it deepened the color?Some dark waxes recommend you apply clear wax first to avoid staining the paint. This allows the dark wax to be more workable for blending and removing the excess. But on this table, I cheated to speed things up by blending clear wax and dark wax together.
I put some clear wax onto a paper plate and added a few dollops of dark wax (a little goes a long way) and blended them together with a painter's palette knife. I applied the wax in sections with a wax brush, letting it nestle into the grain of the oak and wiping the excess with a lint-free rag. I also waxed the tabletop and went right over the furniture transfer with the wax which gave it an aged appearance. Next, I buffed the wax with cheesecloth but a lint-free rag or old t-shirt works just as well.
I went back in with more dark wax along the edges of the table base and top, blending the wax towards the center. For this step, you do not buff the wax. The wax fully cures in 30 days but you can gently use the table within 48 hours.
So what do you think? Have you ever tried Prima furniture transfers? If not, I hope my table has inspired you to give them a try. If a furniture transfer seems a little daunting, try a smaller transfer on a DIY sign, flower pot, or serving tray. I promise once you do you'll be hooked!
If you have any questions about this makeover, please leave them in the comment section below or press the Contact Me button at the top of the blog to drop me an email. I love hearing from you!
Please join me to take a look at how my talented friend's transformed these furniture pieces. Press the links below to see the after photos and tutorials.
- Girl In The Garage
- Confessions Of A Serial DIYer
- Petticoat Junktion
- Just The Woods
- Salvaged Inspirations
- The Interior Frugalista (that's me)
I share my projects at these inspiring link parties.


