Are you a fan of the gradient Ombre paint finish on furniture? I think it is so pretty and have been wanting to try this technique for at least a year. Waiting for the right piece of furniture and mustering up the courage to give it a try, I finally gave it a go with a pink ombre 5-drawer waterfall dresser makeover.
With this technique, it is common to paint each drawer in a different gradient color but I wanted to switch it up a bit by having the gradients meet ON the drawer fronts rather than in between. Perhaps a little risque considering this is my first attempt at an ombre paint finish. Another thing I did differently is not to measure the color sections evenly because I wanted the light pinks to be more predominant.
Feeling a bit nervous about how to blend the color transitions I remembered my friend Denise from Salvaged Inspirations did a tutorial on ombre color blending and so I hopped on over to her blog for some helpful tips. While I definitely need more practice with this technique, I'm quite happy with the results.
I should mention that the makeover was done while battling the nasty flu where my bed was beckoning but the deadline to get it done in time for Furniture Fixer Upper Day was looming. If you're new around here every month five talented furniture painting friends and I come together to breath new life into six pieces of furniture. You can find links to all the makeovers at the bottom of this post. My makeover last month was a Black French Poem Flip Top Table.
But first to appreciate the ombre makeover you've got to see the wood dresser before for comparison.
It is my rule not to buy previously painted furniture for several reasons, one is dealing with annoying paint drips. I think Mr. Frugalista (my official furniture buyer) must have been mad at me that day because when he walked in the door with this one on the dolly, I wasn't jumping for joy.
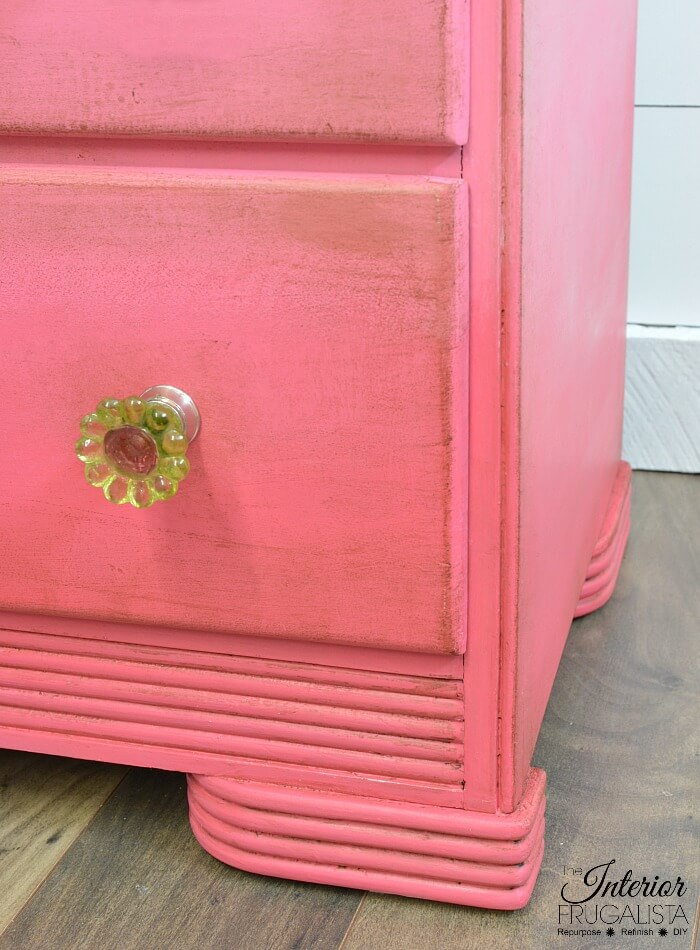
Painted with four gradient paint colors and aged with dark wax, it looks so much better, wouldn't you agree?
The detail on the top drawer is unique to this style of a dresser and so I highlighted them so they were pronounced.
The pretty sage artisan powder echoes the green in the pretty floral glass knobs.
Once the filler dried and was sanded smooth I primed the dresser with two coats of Zinsser Bulls Eye Primer.
Medium Pink second from the bottom
Ratio = 1:1 Two scoops Red Barchetta and two scoops Pink Cashmere.
Light Pink second from the top
Ratio = 0.5:1:1.5 Half a scoop Red Barchetta, 1 scoop Pink Cashmere, and 1 1/2 scoops Snow.
Pink Cashmere on the top
Ratio = 1:0 One scoop Pink Cashmere
I painted two coats per color except for the lightest pink cashmere color, it required three coats. I started on the bottom with the darkest paint color and worked my way up. So I could get some practice with the technique I painted the sides of the dresser first and then slid the drawers back in and lined up the colors.
Instead of blending wet paint colors together with water and a brush like the previous step, we're going to create the color blends onto three paper plates as follows:
If you have any questions about this makeover, please leave them in the comment section below or press the Contact Me button at the top of the blog to drop me an email. I love hearing from you!
Pink Ombre 5-Drawer Waterfall Dresser Makeover
With this technique, it is common to paint each drawer in a different gradient color but I wanted to switch it up a bit by having the gradients meet ON the drawer fronts rather than in between. Perhaps a little risque considering this is my first attempt at an ombre paint finish. Another thing I did differently is not to measure the color sections evenly because I wanted the light pinks to be more predominant.
Feeling a bit nervous about how to blend the color transitions I remembered my friend Denise from Salvaged Inspirations did a tutorial on ombre color blending and so I hopped on over to her blog for some helpful tips. While I definitely need more practice with this technique, I'm quite happy with the results.
I should mention that the makeover was done while battling the nasty flu where my bed was beckoning but the deadline to get it done in time for Furniture Fixer Upper Day was looming. If you're new around here every month five talented furniture painting friends and I come together to breath new life into six pieces of furniture. You can find links to all the makeovers at the bottom of this post. My makeover last month was a Black French Poem Flip Top Table.
But first to appreciate the ombre makeover you've got to see the wood dresser before for comparison.
It is my rule not to buy previously painted furniture for several reasons, one is dealing with annoying paint drips. I think Mr. Frugalista (my official furniture buyer) must have been mad at me that day because when he walked in the door with this one on the dolly, I wasn't jumping for joy.
Painted with four gradient paint colors and aged with dark wax, it looks so much better, wouldn't you agree?
The detail on the top drawer is unique to this style of a dresser and so I highlighted them so they were pronounced.
The pretty sage artisan powder echoes the green in the pretty floral glass knobs.
So here's how I did it...
This post contains affiliate links for your convenience so you can see what products I used or recommend to make this project. See my full disclosure policy.Prep the dresser for paint
I'm not going to lie, this is the most tedious BUT important step of a makeover. Concerned whether the glossy black paint may contain lead, I had no intention of sanding the dresser. After a good scrub with vinegar and water, I patched the scratches and dents with filler compound.Once the filler dried and was sanded smooth I primed the dresser with two coats of Zinsser Bulls Eye Primer.
Custom paint colors
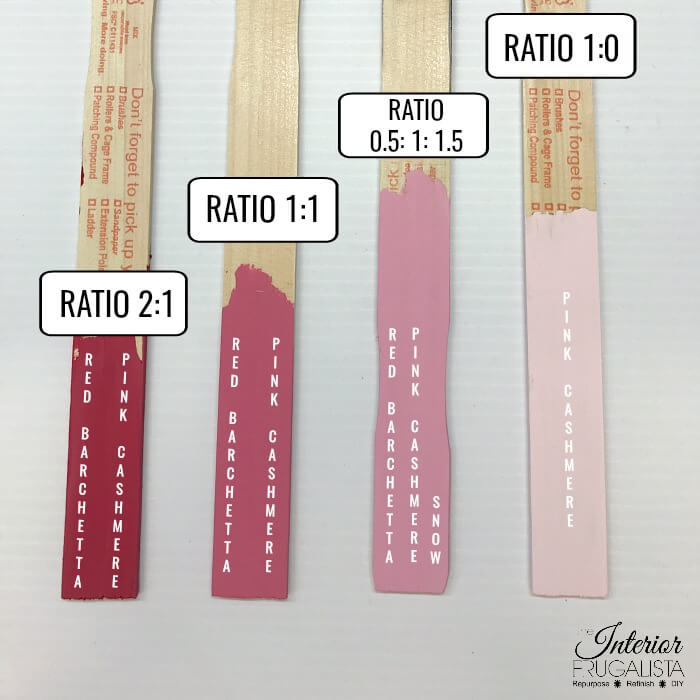
The chalk paint colors I used are Pink Cashmere, Red Barchetta, and Snow from FAT Paint Company mixed into four custom paint colors.
I measured the paint with a coffee measuring scoop and mixed the colors in small glass mason jars. Next, I labeled the jars with each ratio on masking tape just in case I ran out of paint and needed to mix another batch. Thankfully I had enough for two coats of each color.
Dark Pink on the bottom
Ratio = 2:1 Two scoops Red Barchetta and one scoop Pink Cashmere.Medium Pink second from the bottom
Ratio = 1:1 Two scoops Red Barchetta and two scoops Pink Cashmere.
Light Pink second from the top
Ratio = 0.5:1:1.5 Half a scoop Red Barchetta, 1 scoop Pink Cashmere, and 1 1/2 scoops Snow.
Pink Cashmere on the top
Ratio = 1:0 One scoop Pink Cashmere
Tips for painting Ombre
The first thing I did was mark with painters tape where the color changes would land on the dresser. Like I mentioned at the top of this post, I didn't separate the colors per drawer so some landed on the actual drawer front. Next, I removed the drawers so I could paint the rails on the dresser first.I painted two coats per color except for the lightest pink cashmere color, it required three coats. I started on the bottom with the darkest paint color and worked my way up. So I could get some practice with the technique I painted the sides of the dresser first and then slid the drawers back in and lined up the colors.
Ombre blending technique #1
Where two colors meet dampen the paint with a spray bottle and blend them together with light pressure on the brush in a wispy up and down motion about four inches. Keep the paint damp with a spray bottle as you work. Move onto the next color change and do the same. This is a much quicker blending technique than the one I used below.Ombre blending technique #2 (the one I used)
If you're new to color blending this is a foolproof method of blending ombre paint colors. Let the paint dry to the touch before moving onto the next color. Where the color transitions meet, use a criss-cross motion with your brush to avoid a straight line.Instead of blending wet paint colors together with water and a brush like the previous step, we're going to create the color blends onto three paper plates as follows:
Mix 1 teaspoon each of the dark pink and medium pink paint colors.
Mix 1 teaspoon each of the medium pink and light pink paint colors.
Mix 1 teaspoon each of the light pink and pink cashmere paint colors.
With a damp brush (use a spray bottle), dry brush (very little paint on the brush) the blended colors where they meet about four inches. Paint in random up and down and criss-cross pattern to avoid a straight line. To keep the paint moving, dampen the brush with a spray bottle. Move to the next color transition and blended paint color mix.
Protecting and aging the paint with wax
My biggest challenge was deciding whether to keep the ombre colors clean with just clear wax or age the waterfall dresser with dark wax. I went with my gut and aged it.
First I applied clear wax with a wax brush to the entire dresser and buffed it in. Next, I dipped just the tips of a hard bristle paint brush into dark wax and dabbed the excess onto a paper towel. With very little pressure on the brush, I applied the dark wax along the edges of the dresser and each drawer front. I did not buff the dark wax (another tip learned from Denise at Salvaged Inspirations).
First I applied clear wax with a wax brush to the entire dresser and buffed it in. Next, I dipped just the tips of a hard bristle paint brush into dark wax and dabbed the excess onto a paper towel. With very little pressure on the brush, I applied the dark wax along the edges of the dresser and each drawer front. I did not buff the dark wax (another tip learned from Denise at Salvaged Inspirations).
Artisan powder highlights
Knowing the knobs I planned on using were pink and green, I highlighted the carved details on the top drawer with both dark wax and sage artisan powder, applied with a small artist brush. I love how it pulls the green from the glass knobs.
New glass knobs
On the top drawer, I added pretty glass knobs salvaged from my farmhouse dresser makeover. The pretty floral glass knobs on the remaining drawers I've had in my stash for a couple of years just waiting for the right piece of furniture.
The pretty pink cashmere color on the top portion of the dresser has just a hint of pink. The stacked books on top of the dresser may look familiar. Recently I shared a tutorial on how to chalk paint hardcover DIY Decorative Books For Spring.
The pretty pink cashmere color on the top portion of the dresser has just a hint of pink. The stacked books on top of the dresser may look familiar. Recently I shared a tutorial on how to chalk paint hardcover DIY Decorative Books For Spring.
Normally I like to line the drawers with pretty paper but the flu got the best of me and I didn't get it done in time for this post. I will definitely finish the drawers before listing the dresser to sell.
While I'll be the first to admit I need more practice with this technique, I think the dresser turned out pretty good considering. I can see this pink ombre waterfall dresser in a little girls room but it would also be lovely in a big girl's dressing room or walk-in closet.
Repurposed Waterfall Headboard Upholstered Bench
Decoupaged Burlap Waterfall Dresser
Vintage Waterfall Vanity Goes Hollywood Glam
More Waterfall Furniture Ideas
Black Painted Waterfall HutchRepurposed Waterfall Headboard Upholstered Bench
Decoupaged Burlap Waterfall Dresser
Vintage Waterfall Vanity Goes Hollywood Glam
If you have any questions about this makeover, please leave them in the comment section below or press the Contact Me button at the top of the blog to drop me an email. I love hearing from you!
Now let's take a look at how my talented friend's transformed these furniture pieces...
Press the links below to see the after photos and tutorials...
- Girl In The Garage
- Confessions Of A Serial DIYer
- Petticoat Junktion
- Prodigal Pieces
- Just The Woods
- The Interior Frugalista (that's me)
I share my projects at these inspiring link parties.


